

Policy connects the artifacts in your source control to the exact image your organization approves.
Policy Groups and image mappings
Section titled “Policy Groups and image mappings”| Concept | Purpose |
|---|---|
| Policy Group | Applies phases to all repositories or a selected scope. |
| Image mapping | Defines a source, target, reason, and optional platform. |
| Draft | Holds editable changes without changing live evaluation. |
| Published version | Preserves the immutable policy used by live evaluation. |
Create your first policy and mapping
Section titled “Create your first policy and mapping”Open Policy, choose Create policy group, and give it a name. Select whether it applies to all repositories or only an assigned set.
Add a mapping with:
- From image: the observed source image or an explicit wildcard.
- Target image: the exact approved destination.
- Platform: an optional OCI operating system and architecture scope.
- Reason: the organizational decision in terms a later reviewer can use.
Targets must be exact. A policy cannot contain two draft mappings for the same normalized source image and platform scope.
Chaining image mappings
Section titled “Chaining image mappings”The target of one image mapping can be the source of another. BIMP follows the chain of mappings and resolves the image to the final target. This lets you describe a sequence of approved updates while keeping every transition explicit.

Match source images with wildcards
Section titled “Match source images with wildcards”Source mappings support explicit * wildcards across the complete normalized
image reference:
| Source | Example match |
|---|---|
node |
The exact normalized node reference |
node* |
Concrete Node references beginning with node |
node:18-* |
Tags such as node:18-alpine |
node:18-alpine@* |
Any SHA digest with the matching tag |
All other characters are literal. Use the narrowest expression that represents the transition your organization intends to own.
For example, one wildcard mapping can move every matching Python 3 tag to an exact approved target:
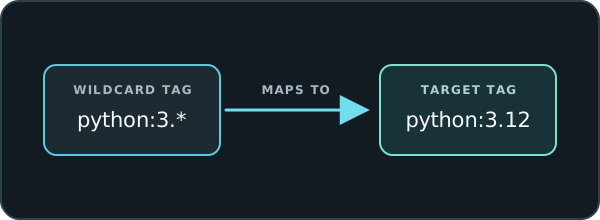
You can use specific chained mappings alongside wildcard mappings. However, a specific mapping always takes priority over a wildcard mapping, so take care not to create orphaned chains. Mappings should ideally resolve to a single target image for each image family, with Exceptions managed in a different Policy Group.
Use Docker Hub recommendations
Section titled “Use Docker Hub recommendations”For recognized Docker Official Images, BIMP can suggest a current target using tag precision, variant, optional platform context, and registry digest observation. It can offer pinned or floating forms.
Open Why this match and inspect the evidence before selecting a suggestion. The recommendation is advisory. It is not a vulnerability result, publisher claim, guarantee, or automatic policy change.
Upload an image mapping file
Section titled “Upload an image mapping file”You can bulk upload image mappings in a CSV or JSON file.
Use the copy button on either example to create a file in the required format.
CSV example
Section titled “CSV example”fromImage,toImage,platformScope,reasonpython:3.11,python:3.12,linux/amd64,Move to the approved Python 3.12 imagenode:18-alpine,node:20-alpine,,Move to the approved Node 20 imageJSON example
Section titled “JSON example”{ "mappings": [ { "fromImage": "python:3.11", "toImage": "python:3.12", "platformScope": "linux/amd64", "reason": "Move to the approved Python 3.12 image" }, { "fromImage": "node:18-alpine", "toImage": "node:20-alpine", "reason": "Move to the approved Node 20 image" } ]}Both formats require fromImage and toImage. platformScope and reason
are optional.
This is a useful workflow if you want to make decisions about your policies in a collaborative way and then upload the final decision to BIMP.
Connect an external image mapping file
Section titled “Connect an external image mapping file”When you create a new policy group, you have the option to choose an internal or external source. An external source is a JSON file that you can maintain in your source control.
For some organizations, policy changes will require approval, which can follow your standard change approval process in your source control.
You can also implement an automated pipeline for adding new image mappings to the JSON file, driving automatic policy updates in BIMP from source.
Once connected, BIMP will automatically synchronize image mappings from the
bimp-mappings.json file in your source control.
- The JSON mapping file must be named
bimp-mappings.json - BIMP must have access to the repository where you have saved the file
Simply select the repository and file you wish to synchronize. You can still review the mappings within the BIMP UI, but you cannot edit them.
Prioritize and organize Policy Groups
Section titled “Prioritize and organize Policy Groups”Breaking down your Policy Groups provides fine-grained control, advanced customization, and policy override options.
- Create Policy Groups that apply to all repositories as your baseline
- Override the baseline with custom policies scoped to a subset of repositories
- Prioritize Policy Groups with a simple stacking system in the UI
- Move repositories between Policy Groups in a controlled way to manage migrations
You may choose to organize your Policy Groups by image type (for example, Python) or by image provider (for example, Red Hat). It is important to set this up in a way that is simple to manage long term. A complete and reliable baseline with fewer overrides will be less complicated to maintain.
For example, if a team requires a custom image policy, you can create a Policy Group, scope that Policy Group to affect only its repositories, and give it the highest priority so it overrides all other policies.
How prioritization works
Section titled “How prioritization works”On the Policies page, you will see a sidebar with a complete list of all your Policy Groups. The lower on the list the Policy Group is, the higher priority that policy takes. It will override anything that appears above it in the list. Move Policy Groups up and down the list by selecting the three dots next to the Policy Group name.
Static image references
Section titled “Static image references”You will sometimes discover artifacts with static image references that never need to be changed. These will clutter your reporting as unmanaged images, so you should create a mapping for them anyway. Use the same From image and Target image in your mapping. These now conform to your policy and will show up as healthy until something changes.
BIMP does not allow artifacts or images to be ignored from scans, but you can configure BIMP to accept those static references.
Assigning policies to repositories
Section titled “Assigning policies to repositories”On the Policy page, you have the option to assign and remove repositories from any Policy Group that is scoped to a subset of repositories.
If you want to update the scope of a Policy Group to apply to all repositories, or switch to only selected repositories, you can do that using the edit Policy Group option and toggling Applies to all repositories on or off.
On the Repositories page, you can add or remove a Policy Group by opening the settings cog next to the repository you wish to update. You cannot remove a Policy Group that is scoped to all repositories.
Advanced policy overrides
Section titled “Advanced policy overrides”You can override a policy at a branch level. Start by making sure that BIMP is monitoring the branches you want to scan. This is managed through the add or remove repositories dialog. Then use the settings cog for that repository to configure a different policy for each branch.
Review draft changes
Section titled “Review draft changes”Draft changes do not affect evaluation until they are published. Choose Publish to open the Review change impact dialog, then check:
- repository and tracked branch;
- artifact path;
- affected source image;
- resolved target image; and
- routine timing or immediate-remediation state.
The review is a dry-run snapshot. It does not publish policy or create pull or merge requests.
It is possible to scope two separate roles in BIMP whereby one user can only draft and the other can only publish policies. This can be useful when regulators require “four eyes approval” on all system changes. Read more about custom roles and permissions here.
Publish policy
Section titled “Publish policy”Choose:
- Publish to make the draft live and let affected artifacts follow routine timing; or
- Publish and remediate to make the draft live and open remediation pull or merge requests immediately.
A Security Administrator or Owner can mark publish-and-remediate as a security
incident. That path records incident state and adds the
bimp-security-incident label to the pull or merge requests.
Inspect and restore versions
Section titled “Inspect and restore versions”Published versions are immutable. Use version history to inspect the policy that governed an earlier action or restore it into a new draft. Restoration does not rewrite history; review and publish the restored draft as a new version.
You can open the policy version history using the three-dot menu on the left sidebar of the Policies page.
Advanced: Policy phases
Section titled “Advanced: Policy phases”You may wish to incorporate multiple sources into a single Policy Group, for example, internal and external sources.
Phases are evaluated in order. A later mapping can continue a transition from an earlier target, allowing a multi-phase policy to resolve to one final destination.
One use case for this is onboarding your organization onto BIMP. On day one, you upload an image mapping file as the first phase of your Policy Group. You then add a second phase that uses an external mapping file in your repository. This second phase is automatically synchronized as you add images to the file. Phase 1 gets you up to date; Phase 2 keeps you up to date.
On the roadmap: Some image mappings require greater manipulation of the Dockerfile, for example, distroless images such as Chainguard or Minimus. These migrations will be implemented as a Policy Phase.
Control external updates with cooldowns
Section titled “Control external updates with cooldowns”A cooldown delays when external mappings become active, giving your teams time to review or coordinate changes before they affect policy evaluation and remediation.
When you use an external source for mappings, BIMP synchronizes changes automatically without requiring a separate review and publish step. A cooldown gives you time to respond if an update introduces a compromised image or if you need to undo a mistake.
To configure cooldowns, go to Settings → Defaults and enable Show cooldown controls. You can then set the organization default in hours or days.